 Does your dog need a paw-dicure? Well, right about now your hard wood floors are probably shouting "YES!" Just like humans, dogs need to have their nails clipped on a regular basis (once to twice month) to prevent ingrown, split nails & breakage. Not to mention it makes the nail clipping process much easier for both parties (you & your dog). Dogs are active creatures and if nails are left untended can make it difficult for your dog to walk and be mobile.
Every month you should check to see if your dog nails are getting to long. A good time to check it is during your dogs grooming & spa day session. A general rule of thumb is that your dogs toe nails should never touch the ground, if they do then they need clipped. If you are uncomfortable and your dog is hesitant about the nail clipping process you can let your vet or groomer do it for you. Hey, remember these are the good guys and have your dogs best interest at heart. Besides, if you need someone to demonstrate the "how to's" they are great people to call on.
 For all you DIYer’s here are some easy & simple instructions on how to clip your dog’s nail without the blood, sweat & tears.
1. Get the right tools! No you can't use your hedge clippers for the job. Be sure to use nail clippers designed for a dog. Human nail clippers are designed to clip flat nails. A dog's rounded nails require circular clippers that clip straight through the nail.
2. Proper Exam-First things first is to examine your dogs nail to determine if and where it should be clipped. Inspecting your dog’s nail will allow you to see if there are any cracked nails that need special attention or TLC.
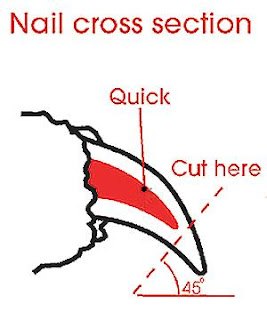
 So what is the quick? The quick is the end portion of the vein, and should not be cut. Cut the nail that grows past the quick. If the dog's nail is white or light-to-medium brown, the quick will be easy to spot. If the nails are black, you will likely not be able to see the quick; make smaller cuts and advance carefully to avoid cutting through the quick. The diagram will help you better understand your dogs paw anatomy, knowing this will make the clipping process easier.
3. Get comfortable-Before clipping, position yourself with your dog in front of you. If possible, have a second person take this position, which can allow you to have full use of both your hands. If a second person is not available, use your body weight to maintain control of your dog.
4. Have a firm grip-Grasp your dog's paw firmly. Maintaining complete control over your dog's paw prevents jerking movements that can cause the clippers to slip and cause injury to your dog.
5. Clip away Slowly- Place one nail through the center portion of the clippers. The side of the clippers with screws and a movable arm should face your dog. Clip each nail at a 45 degree angle, leaving about 2 mm of the nail past the quick.
Remember to trim the dewclaw nail, on the inside of the leg. Since it doesn't touch the ground, it wears down less rapidly than the others.
6. Ready, Set, Squeeze! Squeeze the movable arm of the clippers to clip the nail. If the nail is black, repeat the process, if needed.
It is important that to ease your dog into his first nail-clipping session. Clip a few nails at a time, praise your dog with treats & words and take rest breaks. If you cut the quick, don't panic. After wiping the blood away, apply a small pinch of styptic powder (an anti-clotting agent) to the area and apply pressure for 60 seconds. If you don't have any you can use corn starch, baby powder or cotton balls as a substitute to stop the bleeding.
You see, now that was painless!! In the end keeping your cool is key to making sure your dog remains calm in any situation, even a much anticipated and needed paw-dicure :)

twitter.com/PawLuxury
Don't forget to shop www.pawlux.com for some yummy treats as a reward for good dog behavior. We offer eco-friendly, all natural & organic dog products made in the USA.


EmoticonEmoticon