Today's tip, I learned the hard way.
You would think after 26 years of grooming I would have found a blade sharpener that I like and trust to do a good job.
It seems that I find someone who sharpens blades really well, but does a terrible job on scissors or vise versa.
I also can not stand when I get my sharpened blades back swimming in oil.
I think that jamming blades are one of my biggest grooming pet peeves.
When I used to clip dirty dogs before the bath, my blades would jam all of the time.
Sometimes it would happen so often that I came very close to throwing the blade across the room.
I told you it was a big pet peeve. :)
My blades rarely jam now that I only clip clean, dry dogs.
Today's tip is to warn any groomers reading this blog to check your blades when you get them back from your sharpener.
Check for what you ask.
Check to make sure your sharpener has put your blades back together correctly.
One of my biggest fears grooming is the possibility of cutting a dog.
I am as careful as I can be.
Accidents happen.
That is why they are called accidents.
But when I cut a dog because of someone elses sloppy job, that really pisses me off.
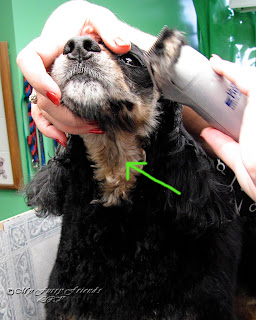
The dog in this picture is one of my favorite dogs to groom.
She is the sweetest thing.
Imagine my horror a few years ago, while running a blade lightly and carefully down the folds of her neck, the blade suddenly catches.
That sickening catch, when you know without looking that the blade cut skin.
Your blood runs cold.
Why?
I was being careful.
I flattened the skin fold on the neck.
There are no little mats for the blade to catch.
Then I remember.
Crap!
I did not check the blade when I took it out of the sharpeners box.
I look at the blade, and sure enough...
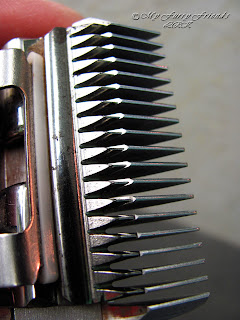
The teeth of the cutting blade were not lined up right after sharpening.
In this picture, I have exaggerated the over hang of the teeth as an example.
The blade I was using on the Cocker, the over hang was not that bad, but for a #7f blade, it was enough to nick the dog.
Luckily the customer was very understanding, but I felt like crap.
It was my fault for not checking my blade before I used it.
This had happened to me once before, years before this particular insident.
I do not remember how I found out about the blade, but since then I always tried to check the blades after they were sharpened.
Once I started clipping after the bath, my blades only needed to be sharpened a couple times a year.
Yes, only a couple times a year.
Because I only clip clean, dry hair, the blades stay sharp for a long time.
I forget once in awhile to check the blades when I take them out of the sharpening box, because it takes me so long to go through a box of newly sharpened blades now.
I had one today.
I started to clip down the back of a nice clean Shih-Tzu.
The blade did not nick, but it was dragging through the coat.
It was just a slight drag, it was still cutting, but a red flag went up.
I stopped and looked at the blade.
The cutting blade was straight like it was supposed to be.
The cutting blade was very close to the tips of the guide blade, but it looked okay.
So I did my test to see if the cutting blade was lined up right.
First, move the cutting blade, back and forth, till both sets of teeth are aligned.
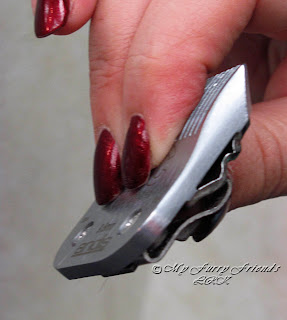
Then I run my finger down the guide blade towards the cutting blade.
It should feel smooth from the guide blade to the cutting blade.
On this blade, the cutting blade was miss-aligned just enough to catch my skin.
It was enough to cause the blade to drag as though it were getting dual.
It was a fresh blade, so I knew it was not dual.
How do you fix a blade that was not put back together correctly?
Depending on the type of screws your blade has, you will need both a Phillips screw driver and a Straight edge screw driver.
Loosen booth screws on the blade.
Loosen them just enough to be able to move the cutting blade around.
DO NOT remove the screws all of the way out of the blade.
You do not have to take the cutting blade all of the way out, unless you need to clean it.
To slide the cutting blade back in, use the Straight edge screw driver to lift the piece that the cutting blade goes under.
I have no idea what that piece is called. :)
Leave the screw driver in while you slide the cutting blade back into place.
The cutting blade in this picture is too far down.
It needs to be moved up to JUST below the tips of the guide blade.
I use my fingers to move the blade up and down till I get it right where I want it.
Once I get the cutting blade lined up straight and where I want it, I use my thumb to press down on the middle of the do-hickey holding the cutting blade.
Keep the pressure firm so the cutting blade does not move while you tighten up the screws again.
Carefully turn the blade over.
Keep pressing!
It is a pain in the bu** when you have to keep going back and straightening the cutting blade again.
I press the blade to the table, while still squeezing the do-hickey to hold the cutting blade in place.
Make the screws tight, but not too, too tight.
Got that?
Maybe?
I hope?
This is the way the cutting blade should look.
Test the blade again.
Your skin should not catch.
It should be a very smooth transition from guide blade to cutting blade.
I also use Kool-Lube to clean out my blades.
I have read a lot of posts where other groomers don't like Kool-Lube.
They claim it jams up their blades.
It does not do that for me.
The only thing I can think of, is that they are not wiping off the Kool-Lube before they start clipping again.
I spray the blade, then wipe it off, then blow any moisture out from between the teeth and wipe the blade again.
I make sure that there is no moisture left on the blade.
It works great for me. :)
I hope today's tip has been helpful.
Happy Grooming, MFF


EmoticonEmoticon